The original hatch was not acceptable for reasons discussed on the Found Condition web page and so we had to figure out what to do. This was very early in the project and so some of the lessons that we learned on this hatch were used, for example on the forward rope locker fabrication.
While we did look on Ebay to see if we could find a hatch of the right size to start with, by the time we began thinking about this hatch we had already decided on making the fish box as big as it could possibly be and still not interfere with existing structure in the bilge such as steering, gas tanks etc.
In hindsight it was probably a mistake to do things in this order because of the amount of time and money we spent fabricating our own hatch door and water channel for the back hatch. What we should have done was go to a boat salvage yard and find a hatch that was bigger than our needs and then cut the entire hatch and water channel out of the old boat with a chain saw or whatever. It would have been MUCH easier to integrate this into our deck than it was to create the hatch and water channel from scratch. For the forward rope locker we learned half that lesson and bought a new hatch lid from Ebay but we still had to fabricate the water channel and that took a lot of time to get it perfect. There is certainly a chance that we will want to put in more flush cockpit deck compartments in the future and if we ever do that we will definitely start with a hatch door and water channel cut out of another boat.
In any case, to make the hatch we created a simple rectangle of the proper size by nailing some wood strips to an old door that we had put on sawhorses. We then used bondo to create nice radius' on the corners and then we sprayed it with many coats of PVA (mold release).
We then tried to spray in some gelcoat but our sprayer died and so we just pushed forward building the hatch and decided to put gel coat on it as a 2nd step. Most of this will be covered with nonskid anyhow.
Below is what the top of the piece looked like after popping out of the mold. We then used hand chisels to cut in the insets for the flush mount hings and hatch pull.
Here is the underside. That framework on the bottom is just welded 1/8" angle iron in order to ensure it had mechanical strength so that it would not flex or deform under use. Since its completely encapsulated in poly resin it will not rust.
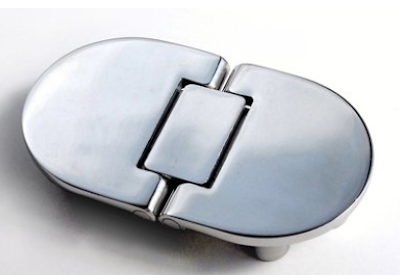
We used high end stainless articulating hinges per below.
Here's a close up of the hinge cut out. It didn't have to be perfect because gel coat would be making up the difference.
The hatch pull is nothing fancy. The main requirement for this was that it had to be 316 stainless and flush mount.
Here's the completed hatch door which has been gel coated and is test fitted to the cockpit. Note the splatter treatment on the bottom which adds a very professional inside look. In order to get this nice blue we had Home Depot sell us an ounce of bright blue paint coloring and we just mixed that into the white gel coat. Yes they make blue gel coat but this was cheap and fast and good enough for a bilge facing hatch door.


No comments:
Post a Comment