Thursday, May 30, 2019

Refitting the forward toe rail

They say a picture is worth 1000 words and so the picture below should tell you why we decided to do a major modernization on the toe rail (which is the wood underneath the lifeline handrail vertical uprights).  In the picture below you can see how the toe rail of our boat stacked up (or fell down as it were) against that of the boat on blocks next to us, a classic Egg Harbor of about the same vintage as Third Wave.  The Egg Harbor has a more desirable welded stainless handrail but we did not want to put our money there.  But the toe rail on the Egg Harbor was freshly varnished at the time whereas ours was worn out grey teak.  The wood was uneven after years of wear and the wood was so old it would no longer take varnish.   And prepping and varnishing the toe rail the proper way, without getting varnish all over everything is no small job.  Yet with the age of our toe rail wood, the best we could hope to expect the varnish to stay was maybe 4-6 months.  Maybe.  Redoing the toe rail twice a year for the rest of our boating lives did not carry much appeal.

Now at this point, a purist would have said it's time to break out the checkbook and buy a new teak toe rail.  A major problem with that, besides all the work involved, is the cost.  I can't quote an exact price but this is thousands of dollars for materials and labor.  As one old timer posting on a boating chat room put it, "Replacing toe rails is not for an amateur. Forming wood to three dimensions is not a skill you duplicate on the first trip. Sorry, this really is not easy.".  And those who do boat repair know damned well.  They figure if you are dumb enough to ask the cost you might be dumb enough to overpay for the work. And of course teak wood is astronomically priced.

Additionally, just putting new teak down doesn't mean you have no maintenance going forward.  Maintenance is simply possible at that point.  A far better option for us was to just rip the rotten teak off and throw it in the dumpster and then glass the seam shut and gel coat the surface.  Then and only then would there be no more varnishing of the exterior bright work.  Yeah I know, a lot of people will hate the idea but none of them offered to re-do the teak every 4-6 months so they don't get a say.  Besides, exterior teak actually makes  boat look old and we would rather have a more modern look that is far cheaper, easier to maintain, and guaranteed not to leak.

The picture to the left shows more of the "before condition" of the teak toe rail.  We knew that the toe rail covered seams and that there would be a significant amount of glassing, filling and fairing to get it right, but the end result was deemed to be worth it.


Step 1 was to remove all the stainless hardware.  That included the ancient looking and weather worn chrome plated air scoops as well as the lifeline vertical uprights and the old 6" cleats and deck fills. 


The cleats were old, incorrectly positioned, and too small.  Plus there were old style and made of chrome plated brass.  316 stainless is cheaper to buy new for a larger 10" cleat with modern styling and very low maintenance.  Also, the existing cleats had no backing plates.  We fixed all of that by creating 3/8" backing plates from 304 stainless and then drilling and tapping holes.


The old deck fills and hardware all came off without too much resistance.


We tore the old teak wood off easily into small chunks with claw hammers which is a testament to how old and washed out it was.  New teak would have fought us tooth and nail to remove by force.  The remaining brass screws either unscrewed with a Phillips screwdriver or came out with vice grips.


The center of the seam was then ground out with a big Makita grinder polisher equipped with 36 grit flap discs.  Man did this throw some nasty fiberglass dust into the air for 30+ feet all around the boat when it was happening.


We then glassed the seam in with multiple layers of 17 oz cloth and epoxy resin.


And then came the multiple layers of fairing compound.  Spread it on, sand it off, gel coat it in order to see how bad it still was, sand out most of the gel coat and reapply fairing compound.  It took about 4 full cycles of this to get it to a passable state.


The down sloping portions here needed significant glassing and fairing to get them into shape.  There are no shortcuts here.  Any shortcut you take results in an amateurish looking finished product.


Here's the port side.


You really can't tell what you have until you put some gel coat on it.  While getting close, this still had too much ripple in it and we had to hit it again with the "long board" which was a piece of 4x6" lumber with handles that sandpaper had been taped to the bottom of.  Once the gel coat was sanded down, another lay of totalboat epoxy filler was added.


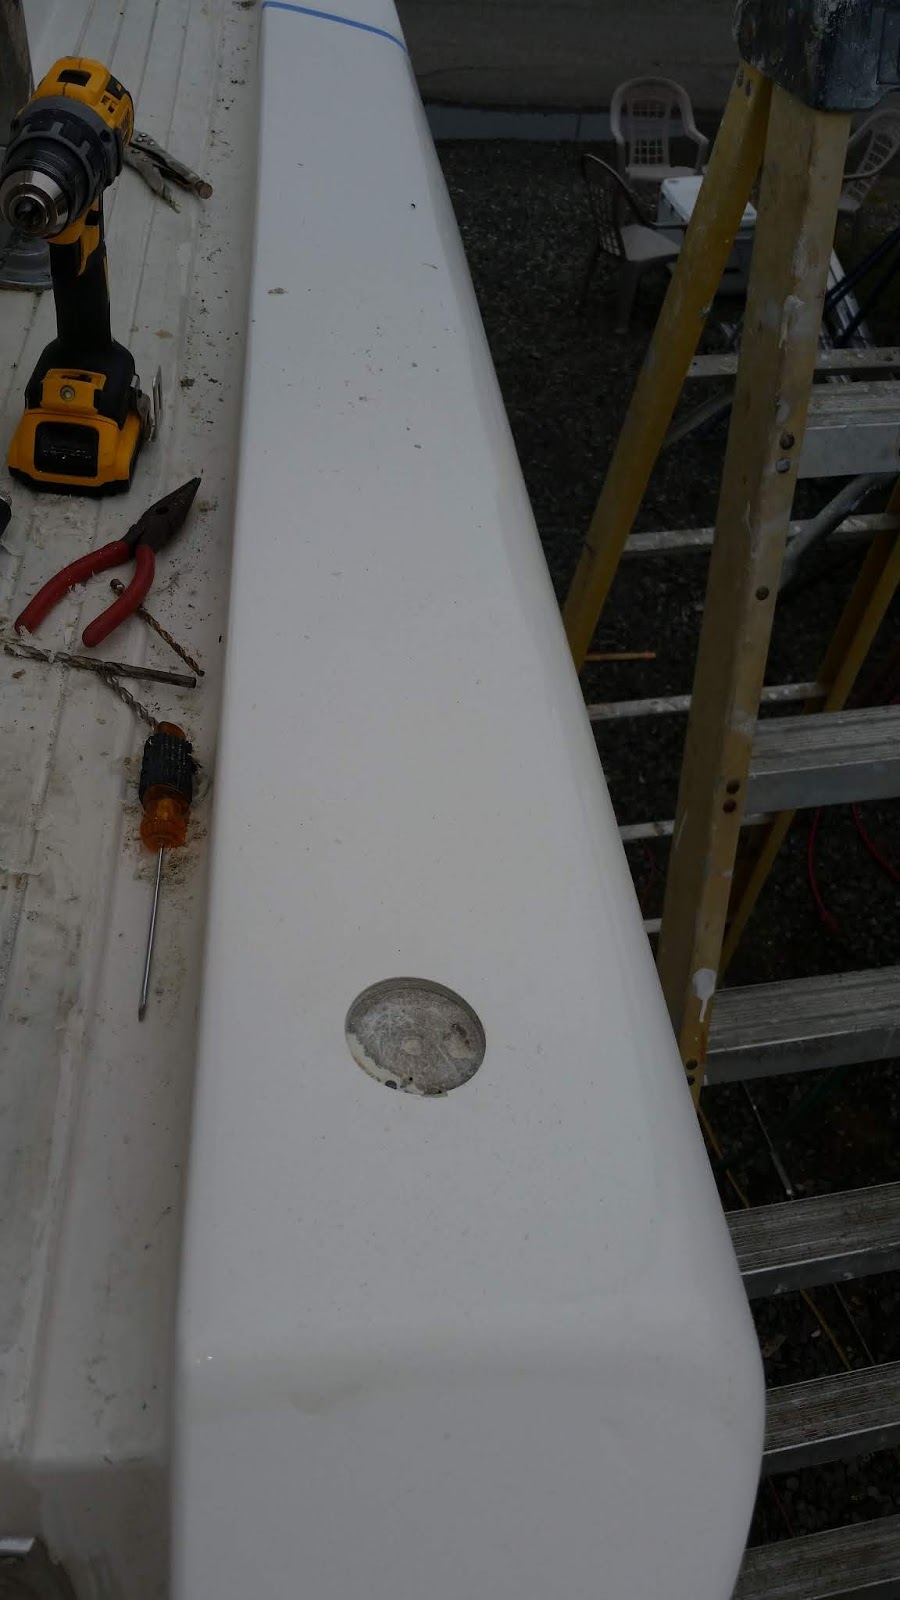
Finally we got the toe rails fair and right all around and so we decided to polish, buff and wax a 6' section just to get a feel for how it would eventually look.  It's hard to tell from the picture but that is literally a show room finish.  The hole is there for the flush mount gas fill deck fitting.


More to come!

Wednesday, May 29, 2019

Blower vent removal

I am not a fan of holes in the side of a boat which are not part of a closed system.  If water goes up a closed system like the generator exhaust, air conditioner water raw water outlet or even in a worst case, the gas vent, at least it doesn't go into the bilge.  In the case of our boat, someone had cut a big fat ugly hole in the side of the boat only about 24" above the water line and then connected an old rectangular bilge blower to the hole.  The blower unit was corroded badly but it still ran.  Still, we would find another way to vent the bilge during engine start that didn't require there to be a big ugly 6" by 4" hole that was covered by a cheap looking louvered plate.


As with the holes in the bottom of the boat, this hole was scarfed although not nearly 12:1.  But it's really not taking any load so I am sure that the contact area will be enough to hold, especially with the use of West Systems epoxy.


Due to the size of this hole, before we patched the front of it we pulled a piece of epoxy soaked cloth across the backside and let it cure.  This gave the patch something to push against when laid in place from the outside.


A layered, tapered patch was created, same as it was for the holes in the bottom, and the hole was gooped up with epoxy resin.


The patch was then squeegeed into place using waxed paper to protect the top layer of the patch from being moved around relative to underlying layers by the squeegee.  We made sure that the ridge in the middle of the hole was filled without voids. 


When we placed this patch, the outside temperature was at the low end of the allowable range.  Thus it took all night to cure to any degree.  As we checked on it over the next couple hours we noted it was slowly sliding down the side of the boat under its own weight.  In order to lock it into place, we taped a masonry trowel which had a lot of surface area on top of it and let it set overnight.


We were lucky that the patch was not fully cured the next morning or we might have had to grind that trowel off of there.  But with some effort we coaxed the trowel free without hurting the patch.


The patch was later sanded and faired and is now ready for gel coating.


Some might be curious where the bilge blower vents were relocated.  We decided to go with twin inline blowers that connect to these stainless louvers, one port and one starboard, that would probably be mistaken for courtesy lights at first glance.  They are up out of the way and all fumes are still discharged outside of the cockpit.  The are up high and safe from water intrusion and have been through many strong storms in the marina already without blowing any water back down into the bilge.  This spot almost looks like it was made for the blower vents.


Click here to see how we handled the rotten toe rail.


Replacing existing seacocks and filling deprecated holes

The bottom of the hull had many extra seacocks in it when we bought the boat.  Like most older boats, the chain of prior owners were none too careful about drilling holes in the bottom and sides, but once drilled they would never take the time to fill a hole that was no longer needed.  Since a huge number of "dock sinkings" are attributed to failed through hull fittings below the water line it was imperative to our refit efforts to replace all though hull fittings either above or below the water line and then fill the holes of extra through hull seacocks that were no longer going to be used OR which we wanted to move for one reason or the next.

IIRC we removed about 8 through hull fittings, with five of them being stuck in the closed position and one stuck in the open position.  Below is a picture of our second round of seacock removals so you can see what a nasty mess they were.  It doesn't matter what these went to but you can see that they are badly corroded.  #1 and #5 used backing blocks made of wood which was disintegrating.  #4 basically had no base and no block.  It was in no way approved for use as a seacock.  It would be fair to say it was a sunk boat waiting to happen.  None of these would have passed current ABYC requirements for withstanding 500 lbs of lateral force for 30 seconds.  When I went to test the engine seacocks with the previous owner watching he cautioned me not to pull too hard on the handles (even though they were very difficult to open) because he worried that the handle might break off.  And people wonder how boats sink at the dock...

Replacement of main engine seacocks.  
Just forward of the port engine the original setup had the seacock for the port engine as well as a separate seacock for the generator (which mounted amidships).  Given that we planned to move the generator to the starboard side and so that its weight would offset the fresh water tank opposite it on the port side it made sense to us to move the generator seacock.  The main engine seacock and strainer is circled below and the generator seacock and strainer is pointed to by the arrow.  Both of these seacocks were clapped out and the seawater strainers were beyond their service life as well.


We decided to replace the main engine seacocks with Groco SBV1500 units that contain the removable service plug for out of water testing, winterizing until we can leave Virginia, and maintenance.  With this side port option we can leave fresh water in the engine's raw water system between trips to the boat even though it will be docked in salt water in the Bahamas.

These Groco seacocks don't come cheap but they will pass all safety standards and we like the heavy bronze handles that will accept a 3/8" socket wrench head if you need more leverage moving them.  We plan to regularly maintain the ball unit in these to preserve our investment.  We paired these 1-1/2" seacocks with Groco backing plates which have built in bronze nuts.  The notion is that you can 5200 the backing plate in place, screw a scoop fitting in tight from the bottom, and then bolt the seacock to the backing plate for a very strong installation.  We also glassed the backing plates to the boat as you will see later for an overkill job on these seacocks.  In the future if they ever get stiff on us I don't want to have to worry about using a breaker bar to get them moving again.  We replaced the old bronze strainers with modern Forespar Marelon ones.


We then moved the engine seacock to where the generator seacock had been because it allowed for a shorter hose to the engine raw water pump with fewer bends in it.  The area around both of the holes was sanded in order to get access to clean fiberglass.


The seacock base was then bedded with 3M 5200 and then glassed in with West System epoxy resin and layers of #17 cloth before installing the scoop underneath the boat. I think you will agree, that engine seacock is never going anywhere...


Underneath the boat we needed to fill the generator hole, so the area around the hole was prepared by using a grinder with 36 grit flap wheel to taper the sides of the hole into the center.  We read online that the area to taper (AKA "to scarf") should be a diameter 12x as large as the hole in order to assure maximum strength.  It sounded like overkill but we like overkill when it comes to the bottom of the boat.  Unfortunately, the full 12:1 of the 1-1/2" hole would have been 18" and that would have gotten us into the area of the engine seacock hole.  Instead we went with about 11" diameter taper for this hole.  That along with reinforcement from above will bring us back up to the desired overkill.


We built the patch up in layers using concentric circles of #17 cloth.  Each layer was laid in with West Systems epoxy and then the air was squeegeed from each layer using wax paper and a Bondo spreader.


After gooping the tapered portion with epoxy resin, we then applied the patch using the waxed paper to position it into place and then to squeegee it free of bubbles for the last time.


When cured it was sanded fair, filled to remove miner holes and then gel coated again as a moisture barrier.  Up in the engine bay, glass was added on top of the patch to make a nice sandwich out of it. Eventually it will receive a new barrier coat and then bottom paint.  We ended up filling multiple holes on the bottom using this method.


Click here to see how we used a similar process to patch an old blower vent hole in the side of the boat.


Friday, May 24, 2019

Cockpit console

On its face, the cockpit console looks like the typical bait prep/fillet station but we also added several custom features which make it into a unique cockpit beverage bar.  Main features are:

  • Large bait prep and fillet surface
  • Built in cockpit sink with macerator-equipped drain 
  • Hot and cold running water
  • Water spigot for dispensing chilled reverse osmosis drinking water
  • Triple beer tap for those floating kegger parties anchored off the beach
  • Back-lighted ice chest/beer cooler with automatic open/close lid
  • Multi-dispenser for hard liquors
  • Halon fire extinguisher storage locker
Since we wanted something that would have nice rounded corners as well as insulation properties for the ice chest, we used some medical grade glass infused foam material that was taken from some discarded boxes used for human organ transplants.  Of course we washed it with chlorine water...  The material is quite sturdy on its own but is kind of nasty to use because cutting or sanding this ultra high density foam releases a ton of fine fiberglass particles that are guaranteed to make you itch for at least a day or two after working with it.


After stripping off the outside plastic sheet we epoxied the halves together and then made a similar base for the unit out two more of the boxes and then stacked them to achieve the desired height of the cockpit console unit.  We then positioned the new sink where we wanted it and cut the hole for it.


We then took 4" PVC pipe and inserted it in the lower unit at a downward sloping angle so that the fire extinguisher could never slide out even in roughest of seas.  That angle was cemented in place with "Great Stuff" foam in a can.


With the base unit well defined, a divider was placed in the top half between cooler section in the top right quadrant of the unit and storage section in the top left quadrant.  Lower right is where the fire extinguisher would live and lower left would be another small storage cubby. Once this was all determined, we wrapped it with multiple layers of 17 oz cloth using West System epoxy resin.


We then cut up the lid units into three pieces as shown below, left.   The piece with the cutout for the sink will sit atop the left side of the console unit while the other two pieces form the hinged cooler lid.  Note how hardwood was epoxied into both halves of the cooler lid pieces in order to give us something to screw lid hinges into later on.


In order to ensure all lid surfaces would eventually form a perfectly flat top, a sheet was created consisting of several fiberglass layers and the pieces were epoxied to that flat sheet.  When cured it was then subsequently cut out into two pieces: the top and the lid.


The top without the lid was fitted into place and you can see the location of the hardwood hinge attach points.


With all of this in place, the top was glassed into the main unit as an integrated piece and much sanding was done with a long bar in order to ensure the face and sides of the unit would be flat.  We are talking days and days of work here, not hours.


Spraying gel coat is one of the best ways to find all the imperfections in the prep.  And so we sprayed and sanded the unit at least 3-4 times before it started to look really flat and finished.


A final coat of gel coat allowed us to test fit the doors.  Of course this is not done yet.  It all needs to be sanded with 220, 330, 600 and then polished in order to make it appear that this unit popped out of a mold.


This close up of the top cubby and the lower fire extinguisher compartment (with emergency flares, etc. destined to go in the left compartment next to the extinguisher) shows how much hand sanding we did in order to achieve a nice finish.


With the base unit well on its way, it was time to make the 3/4" thick King Starboard top.  The Starboard was laid down just how we wanted it, lightly taped in place to get the position perfect and then Kyle climbed a ladder and then carefully stepped straight down on the plastic so that I could use a router to cut the sink hole using the sink itself as a router guide.  The edge was subsequently routered with a round over bit to achieve the finished result.


The result was a pretty good looking sink access hole.  A big advantage of this design is that fish goo generated when filleting or prepping bait can be swept directly into the sink basin while completely bypassing the ridge where the sink flange is adhered to the underlying top of the unit.  The back half of the Starboard was fixed to the console while the hinged front piece of Starboard was adhered to the cooler lid using JB Weld plastic adhesive.  In order to prep for this glue we had to heat up the glued side of the Starboard with a torch (you can watch a video about this here; it is the only way that adhesive will stick to Starboard...).


We had some old teak left over from my prior boat and so it was glued together and sanded flat.


The teak butcher block was then cut to size, cut for the sink hole and then trimmed with a rounded over teak strip.  The 316 stainless cooler hinges were added and so was the sink goose neck as well as the reverse osmosis water faucet.


The cooler lid's linear actuator was then installed and tested.  Too much geeky fun!

In the video you can see the exchanger for chilling the reverse osmosis water is already installed in the bottom of the cooler.  To make that we just sweated together lengths of 1/2" copper pipe.  Of course the proper solder was used for potable water plumbing. The heat exchanger was then installed into the cooler portion of the unit and then gel coated to protect the copper from getting a patina and also to give it a more finished look.  


Colored LED strips were then epoxied into the bottom of the cooler.

Now it was time to install the chilled booze containers which would later be part of the hard liquor dispenser built into this unit.  We found some nice square glass jars with stainless lids .  We glassed them together leaving vertical strips open in order to be able to see the booze levels at a glance.  Flexible food grade tubes glued into holes cut into the container lids were then routed to holes in the top starboard where deck fills would connect to them.  In this way the jars containing chilled hard liquor would be very easy to monitor and keep full.


And what's a party without at least a couple of choices of draught beer?  Here we are installing the stainless triple beer tap tower while running the feed tubes though a slot in the very high grade insulation foam which the console unit is made of.  The backside of the unit will not be visible once installed so the tubes were foamed in place with more Great Stuff.


With the beer setup in place, we also added a Sidebar model 6500 push button electric booze pump system.  The pump was installed in the top cubby under the sink and the tubes were run for most of the way out of sight except to bridge the cooler lid hinge.  You can see that the blue push button dispenser pops up nicely to eye height when the cooler is electrically opened by its linear actuator.  The booze dispenser head needed space cut out in the top of the unit to provide clearance when the lid is closed so we created a tray with a built in drain where we will store bar tools and have a small tray of bar fruit.  With a little more thinking we will come up with a good place for storing a few cigars, cutter and flame thrower...


We then wired an LED strip and control switches into each of the storage cuddies and then hooked up the color LED controller for the cooler backlight.


It really looks nice at night and is very flexible depending on the mood of the situation.  It can do static colors, different patterns, or bounce to the music.


Here is the cockpit console rough installed in place showing the linear actuator, cooler LEDs, and storage LEDs. In this video, the Sidebar booze dispenser was just barely hitting the cutout we had made for it but this will be fixed in the final product and the lid will fit flush down on top of the base.