Tuesday, July 11, 2017

Generator installation

Mary Mar (original boat name) was purchased without a generator.  Fortunately I had just rebuilt my Kohler 5E generator with the help of my good friend Gary.  This generator had been part of my previous 38' Commander which I used for a 3 month sabbatical in the Bahamas years ago.  That Commander was not a bad boat but I wanted to move up to the 42' once I was able to find a partner to go in on it with me.

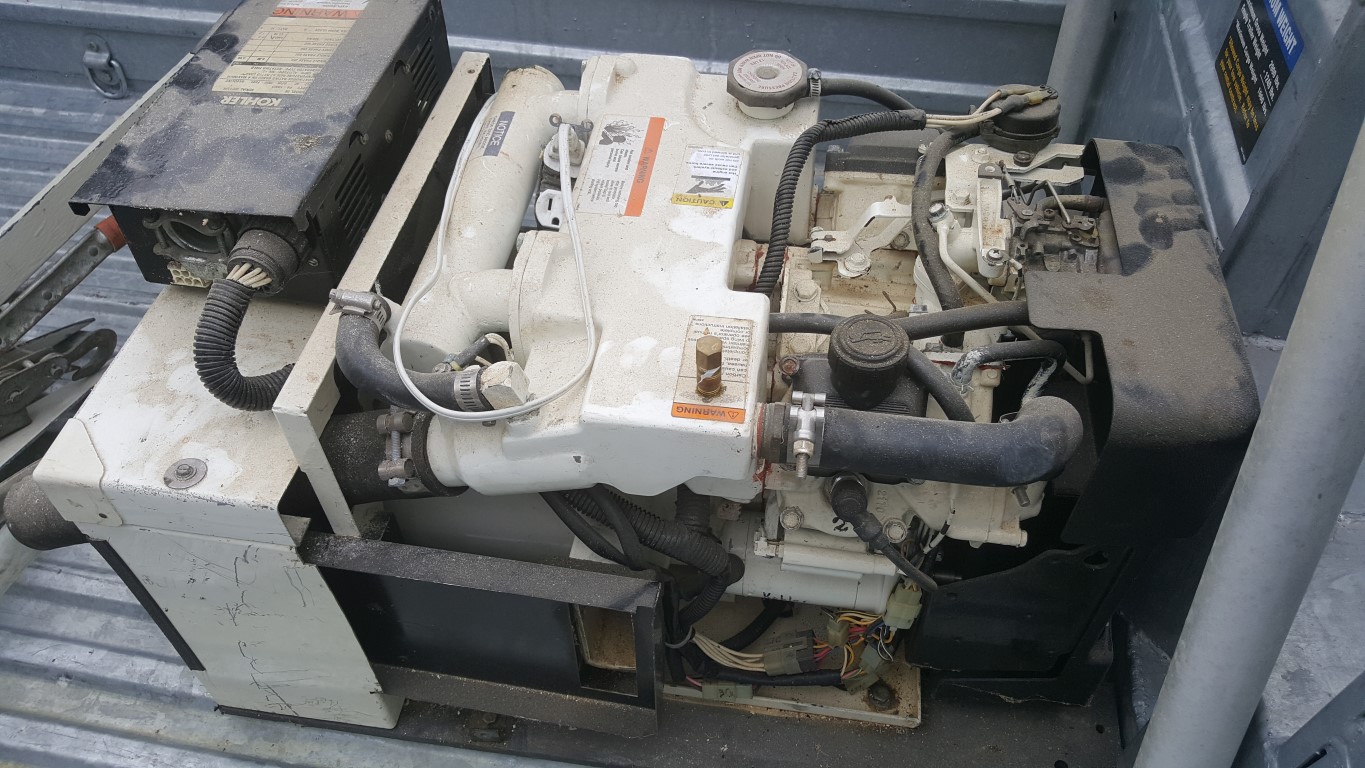
In any case this Kohler gas generator was in really good shape externally but had gotten saltwater into one of the cylinders somehow and thus needed a rebuild.  There is really very little corrosion on it and so it was a good candidate for a rebuild.  It got new pistons, a slight overbore job, new bearing, etc.  The Kohler 5E is a 5 kW rated generator but I happen to know a dirty little secret that Kohler likely does not want told:  The 5E marine generator is the exact same machine as the Kohler 7.3 marine generator.  The only difference is the breaker on the unit.
This is not a conspiracy theory but in fact something often done in industry.  Corporations want to have a product lineup in order to capture a broader range of sales.  But it is expensive to redesign an entire generator for a small difference in power output.  So Kohler designed this generator to be a 7.3 kW unit and then created a "marketing version" in the 5E.  I know this for a fact because everything is the same between the two except the breaker.  They both use the Kawasaki FD-501D 4 stroke gas motor.  They both use the same exact part number generator head (I looked it up in the parts manual for both models).  The only difference is the breaker; the 5E limits the current so that 5kW is not exceeded.  Obviously, Third Wave will upgrade the breaker so that we get the full 7.3kW capability.

In order to install the generator we created a plywood landing pad for the unit as shown below.  First we coated it with poly resin on all sides and then gel coated the top.


We then installed the landing pad in the bilge forward of the starboard engine. Some of these old boats that did not have a transom door (AKA "fish door") came equipped with what I can only describe as an aluminum spar whose purpose was to allow connection of a rope that could be used to haul big fish up over the gunwales.  We used a chain winch with that spar to get the generator onboard and then three of us manhandled the unit into position in the saloon where it was ready to drop down into the bilge.  The spar was then placed horizontally through both of the side windows in the saloon and the chain winch was again used to lower the generator into its final resting place in the bilge.


The generator will be controlled and monitored by a generic digital generator control device called Datakom DKG-116.  Below you can see circled in red where it was installed in the electrical panel.

Below is a close up of the unit.  Not only is it the start and stop button but it also gives Volts AC, Hertz and generator engine hours.  It's a generic control so there is some menu driven setup that has not been done yet but it doesn't look very difficult.


Click this link to see more details about the generation installation.


Monday, July 10, 2017

Refitting the cockpit deck and saloon back wall

"Mary Mar" had been fitted with a poorly implemented “shade tree mechanic” back deck after the twin 140 gallon aluminum gas tanks were replaced by the prior owner ("PO").  The deck was so soft and thin that it had a crack running through it.  I asked the PO how he thought we should fix it and he ducked inside and came back out with one (1) small package of chop mat.
I guess he thought he was pulling a fast one on us out-of-towners because we didn't break out in laughter in front of him out of respect.  But once in private I told my partner that this was a complete joke and that the repairs would be far more significant than what was being portrayed to us by the desperate seller.  I've owned a classic (read "old") 1966 38' Chris Craft Commander before and I had done a lot of glass work on her.  I did not let on to the PO just how much boat repair experience I have had, but for the sake of the reading audience, I have owned boats for the better part of the last 30 years and have chartered many boats owned by others out of Miami.  I always did my own repairs and maintenance.


So the reason we bought Mary Mar was simply that we offered a low price for the legendary hull, new, properly baffled fuel tanks, the Crusader TBI engines (one of them a new crate motor) and running gear.  Despite the PO trying to tell us that the boat was "90% restored" those main pieces were pretty much all we got in the deal.  Most of everything else had to be restored or replaced.
This homemade hatch was installed by the PO without any water channel and of course it leaked and caused extensive rot.  I actually see this as good fortune because without that rot and mold under the deck it might have been more difficult for me to convince my much less experienced boat partner that the deck wasn't "good enough" as it stood.  Yeah, there were no side channels for the drains.  And yeah, the drains were set out well away from the corners.  And sure, the hatch leaked into the bilge.  These by themselves were show stoppers for me because my experience with boats is that you spend the time and money up front and then later on the maintenance is still significant, but not the deal breaker it would be if problems like this are left to fester.  Regardless, others might see it as needless work, especially if they are in a big hurry to get out there and go fishing.  Fortunately Kyle is a reasonable fellow and, being a realtor, when he saw that mold he didn’t need any more convincing.  Instead, he jumped right in to lead the demolition of the deck and the re-build of the wooden joists.
My position was and is that this boat is going to live in the Bahamas and while it really is better in the Bahamas, that only applies to vacationing.  When it comes to building stuff, it is far, far worse over there.  High prices, no selection and Amazon doesn't deliver there.  Thus, the only intelligent thing to be done was to refit the boat completely in the US before even thinking of moving it south from its current location in Virginia to West End on Grand Bahama.

But I digress.  The rot was so bad that the wood could be peeled away with bare fingers.
With help from our VA based friend Wiley, we pulled up that rotten deck, built a new framework using 2x6 pressure treated lumber which was then coated with epoxy resin.  All joints were assembled with 3 1/2" stainless deck screws and then every joint was tabbed in with 2-3 layers of 17 oz cloth and epoxy resin.  The tabbing made a large and obvious difference in the stiffness of the deck underpinnings.  All new stringers were made and no wood was used below the deck level.  The stringers and the deck core were made from 1" thick Coosa Bluewater 26, a popular variety of synthetic "marine board".
The deck panels were made with great care, including the machining of the corners so that we would have good looking cockpit drains in the finished product.


 We fabricated our own hatch, water channel and fish box for the cockpit.
Water channels and drains were planned and implemented.
As we were making good progress on the decks, we decided to take on the repair  and glassing in of the old teak gunwale cap.  There is only so much you can do with 40+ year old wood.  It would not hold a finish anymore and it either needed to be removed or filled/faired and encapsulated in glass.
We sanded the teak down to new wood, faired it out and filled missing chunks with bondo glass.


Below you can see the Coosa deck is complete and the joints have been filled. The hatch has been fitted, the holes for the flush mount hinges have been cut out and you can see the water channel after it has been glassed into the deck.  Those 316 stainless articulating flush mount hinges are fantastic.  The gunwale cap has been filled and shaped and covered with several layers of glass cloth.


We also noted that the smaller 10" existing cleats were substandard for this size of boat and also that the PO had not done a good job of fixing them to the boat.  So we bought 6x8x3/8" stainless bar stock, had it drilled and tapped for larger 12" stainless cleats and then heavily glassed these stainless backing plates to the heavy sides of the hull.  Then we created custom insets and then glassed and faired it all in.


The only real way to see what you have after doing all this glass work is to put some gel coat on it.  And then you see all of the problems, fill them with 3M and other marine fillers and then repeat.  Gel coating was done with $10 Harbor Freight HVLP paint guns whose nozzle was drilled out to 2.5mm to allow good flow of the gel coat.  At $17 per gallon for acetone it costs more to clean these guns then to just throw them away.

We learned by trial and error since I had not done any gel coat work before.  We found that life is much, much MUCH easier if you pay up for a gel coat additive like Duratec or Orca Air Dry super clear coating.  It flows on smoother, cures more reliably and more completely and is thinned by the addition of the additive to be ready for spraying.  There is no need for wax when you use these additives.

In short, it just cuts out of lot of the guesswork and allows someone with little prior experience to achieve great results.  But it does not come cheap.  A gallon of gel coat might cost $80 but a gallon of the additive, which you mix 1:1 with the gel coat, is $170.  So two gallons of normal gel coat cost $160 and two gallons of spray-able product using the additive is $250.  And with gel coat you can go through a lot of spraying/sanding cycles so the gel coat can run up a pretty good bill.  But the before and after makes all the hard work and expense well worth the time and money.  The first few coats we applied were just too white.  So we used it as an inspection coat and then eventually settled on Orca Guard eggshell white #1109. 


As part of the back deck refit we also installed a vinyl sliding double pane glass door and then used 3m exterior hard coat on it (designed to make breaking the glass and entering much more difficult).


The above work took about 150 man days to complete.


Next up: adding the bait tank.